Lesson 3: Planning & Steering Documents - GitHub Copilot Customization
Session Duration: 60 minutes
Audience: Embedded/C++ Developers/Project Managers/QA Engineers/Firmware Engineers
Environment: Windows, VS Code
Extensions: GitHub Copilot
Source Control: GitHub/Bitbucket
Overview
This lesson teaches you how to customize GitHub Copilot’s behavior through planning and steering documents. You’ll learn to create persistent coding standards, reusable prompts, specialized agents, skill folders, and use Plan Mode to turn project ideas into structured issues. These tools ensure consistent, high-quality AI output across your team.
What You’ll Learn:
- Creating
copilot-instructions.mdfor repo-wide coding standards - Building reusable prompt files (
.prompt.md) for common workflows - Designing custom agents (
.agent.md) for specialized personas - Packaging skills with bundled resources for complex tasks
- Using Plan Mode to turn ideas into structured epics and issues
- Spec-Driven Development for production-quality, scalable software
Key Concepts:
| Concept | Description |
|---|---|
| Custom Instructions | Always-on coding standards applied to every request |
| Prompt Files | Reusable task templates invoked with /prompt-name |
| Custom Agents | Specialized personas with specific tools and behaviors |
| Agent Skills | Instruction folders with bundled scripts and resources |
| Plan Mode 🆕 | Turn project ideas into structured epics, features, and tasks |
| Spec-Driven Development 🆕 | Formalized guardrails for AI: constitution → spec → plan → tasks |
| Context Layering | Building prompts with constitution → agent → files → constraints |
Table of Contents
- Overview
- Prerequisites
- Why Planning Matters
- Agenda
- Learning Path
- Copilot Customization Hierarchy
- Custom Instructions
- Prompt Files
- Custom Agents
- Agent Skills
- Plan Mode (Preview) 🆕
- Spec-Driven Development 🆕
- Speaker Instructions
- Hands-On Exercises 🆕
- Quick Reference
- Best Practices
- Troubleshooting
- Additional Resources
- Frequently Asked Questions
- Summary: Key Takeaways
- Next Steps
Prerequisites
Before starting this session, ensure you have:
- ✅ Completed Basic Feature Overview - Understanding of Chat modes, participants, and slash commands
- ✅ Visual Studio Code with GitHub Copilot extensions installed and enabled
- ✅ Active Copilot subscription with access to all features
- ✅ Workspace access - Ability to create folders and files in
.github/directory - ✅ Basic Markdown knowledge - For authoring customization files
Verify Your Setup
-
Check workspace permissions:
- Ensure you can create folders in your workspace
- Verify
.github/directory exists or can be created
-
Enable customization features:
- Open VS Code Settings (Ctrl+,)
- Search for
github.copilot.chat.codeGeneration.useInstructionFilesand enable it - Search for
chat.useAgentSkillsand enable it for agent skills (preview)
-
Test basic functionality:
- Open Chat view (Ctrl+Alt+I)
- Verify agents dropdown is accessible
- Confirm you can create new files in workspace
Why Planning Matters
Front-loading context improves output quality dramatically. Instead of repeatedly providing the same context in every chat prompt, planning documents enable you to:
Benefits of Planning Documents
-
Consistency Across Sessions
- Define coding standards once, apply everywhere
- Ensure all team members get the same AI behavior
- Maintain consistent code quality
-
Reduced Repetition
- Stop copy-pasting the same instructions
- Eliminate redundant context in prompts
- Save time and effort on every interaction
-
Improved AI Output Quality
- More accurate code generation
- Better adherence to project standards
- Context-aware suggestions
-
Team Collaboration
- Share best practices across the team
- Version control for AI instructions
- Onboard new developers faster
-
Specialized Capabilities
- Create domain-specific agents
- Build reusable workflows
- Extend AI capabilities with custom tools
Agenda: Planning & Steering Documents (60 min)
| Sub-Topic | Focus | Time |
|---|---|---|
| Why Planning Matters | Front-loading context improves output quality | 3 min |
| copilot-instructions.md | Repo-level coding standards, constraints, patterns | 5 min |
| Prompt Files (.prompt.md) | Reusable task templates for common workflows | 5 min |
| Custom Agents (.agent.md) | Specialized agent profiles for domain-specific tasks | 5 min |
| Agent Skills (SKILL.md folders) | Self-contained instruction folders with bundled resources | 5 min |
| Plan Mode (Preview) 🆕 | Turn project ideas into structured issues/epics | 5 min |
| Spec-Driven Development 🆕 | Formalized specs for scalable, production-quality AI workflows | 5 min |
| Instructor Demo | Live demo of all features | 7 min |
| Hands-On Exercises 🆕 | Participants practice creating customizations | 20 min |
Learning Path
This lesson covers seven key areas. Work through them sequentially for the best learning experience.
| Topic | What You’ll Learn | Estimated Time |
|---|---|---|
| Customization Hierarchy | Where files go and when they’re loaded | 2 min |
| Custom Instructions | Repo-level coding standards | 5 min |
| Prompt Files | Reusable task templates | 5 min |
| Custom Agents | Specialized personas | 5 min |
| Agent Skills | Bundled instructions with resources | 5 min |
| Plan Mode (Preview) 🆕 | Turn ideas into structured issues | 5 min |
| Spec-Driven Development 🆕 | Production-quality specs with SpecKit | 5 min |
| Instructor Demo | Live demonstration of features | 8 min |
| Hands-On Exercises 🆕 | Practice creating customizations | 20 min |
1. Copilot Customization Hierarchy
File Locations and Loading Behavior
| Customization | Location | When Loaded | Purpose |
|---|---|---|---|
| Instructions | .github/copilot-instructions.md or *.instructions.md | Always (every request) or conditionally via glob patterns | Global coding standards, style guides |
| Prompt Files | .github/prompts/*.prompt.md | When user invokes with /prompt-name | Reusable task templates |
| Custom Agents | .github/agents/*.agent.md | When selected from agents dropdown | Specialized assistant personas with tool configs |
| Agent Skills | .github/skills/*/SKILL.md or ~/.copilot/skills/*/SKILL.md | Auto-discovered from prompt | Task workflows with bundled scripts/references/templates |
Visual Hierarchy
.github/
├── copilot-instructions.md          # Always loaded
├── instructions/
│   ├── cpp.instructions.md          # Loaded for *.cpp, *.hpp files
│   └── python.instructions.md       # Loaded for *.py files
├── prompts/
│   ├── generate-test.prompt.md      # Invoked with /generate-test
│   └── review-code.prompt.md        # Invoked with /review-code
├── agents/
│   ├── ODrive-Engineer.agent.md     # Selected from dropdown
│   └── ODrive-QA.agent.md           # Selected from dropdown
└── skills/
    └── misra-compliance/
        ├── SKILL.md                 # Skill definition
        ├── rules.md                 # Reference material
        └── examples/                # Example code
2. Custom Instructions (copilot-instructions.md)
Custom instructions enable you to define common guidelines and rules that automatically influence how AI generates code and handles other development tasks.
Types of Instructions Files
1. Global Instructions File
Location: .github/copilot-instructions.md
- Automatically applies to all chat requests in the workspace
- Stored within the workspace for team sharing
- Works in VS Code, Visual Studio, and GitHub.com
Example for Embedded C++ Project:
# Project Coding Standards

## C++ Standards
- Use C++17 standard
- Follow Google C++ Style Guide
- Use smart pointers (std::unique_ptr, std::shared_ptr)
- Avoid raw pointers except for non-owning references

## Embedded Constraints
- No dynamic memory allocation (no malloc/new)
- No exceptions (use error codes)
- Static allocation only
- Use volatile for hardware registers

## Documentation
- Use Doxygen-style comments
- Document all public APIs
- Include @brief, @param, @return tags

## Testing
- Use doctest framework
- Write unit tests for all functions
- Aim for 80% code coverage
2. Conditional Instructions Files
Location: .github/instructions/*.instructions.md
- Apply to specific file types using glob patterns
- Multiple files for different contexts
- Stored in workspace or user profile
Creating Path-Specific Custom Instructions
-
Create the directory if it doesn’t exist:
.github/instructions/ -
Create instruction files with the naming pattern
NAME.instructions.md -
Add frontmatter with
applyToglob pattern:
---
applyTo: 'app/models/**/*.rb'
---- Specify multiple patterns by separating with commas:
---
applyTo: '**/*.ts,**/*.tsx'
---
Glob Pattern Reference
| Pattern | Matches |
|---|---|
* | All files in current directory |
** or **/* | All files in all directories (recursive) |
*.py | All .py files in current directory |
**/*.py | All .py files recursively in all directories |
src/*.py | .py files in src/ only (e.g., src/foo.py, not src/foo/bar.py) |
src/**/*.py | .py files recursively under src/ (e.g., src/foo.py, src/foo/bar.py) |
**/subdir/**/*.py | .py files in any subdir/ at any depth |
Firmware/**/*.{cpp,c,h,hpp} | C/C++ files recursively under Firmware/ |
Exclude from Specific Agents (Optional)
Use excludeAgent to prevent instructions from being used by specific agents:
---
applyTo: '**'
excludeAgent: 'code-review'
---
# These instructions are only used by Copilot coding agent| Value | Effect |
|---|---|
code-review | Excluded from Copilot code review |
coding-agent | Excluded from Copilot coding agent |
| (not specified) | Used by both agents |
Example: Python Instructions
---
name: Python Coding Standards
description: Python coding standards for project scripts
applyTo: '**/*.py'
---

# Python Coding Standards
- Follow PEP 8 style guide
- Use type hints for all functions
- Write docstrings for all public functions
- Use pytest for testing
Example: Embedded C/C++ Instructions
---
name: Embedded C/C++ Standards
description: Embedded C/C++ coding standards for firmware
applyTo: 'Firmware/**/*.{c,h,cpp,hpp}'
---

# Embedded C/C++ Standards
- No dynamic memory allocation
- Use static allocation only
- Document interrupt handlers
- Use volatile for hardware registers
- Follow MISRA C guidelines where applicable
Try It: File-Type-Specific Instructions Demo
Use these prompts to see how Copilot automatically applies different coding standards based on file type:
Header File Prompts (.hpp/.h) → header_file_rules.instructions.md
| Prompt | Expected Patterns |
|---|---|
Create a header file for a motor controller class | #pragma once, forward declarations |
Create a header file for an SPI driver | No using namespace, trivial getters inline |
Add a new header file for CAN message parsing | Complex methods declared only (not defined) |
What to look for:
- ✅ Uses
#pragma once(not old-style#ifndefguards) - ✅ Forward declarations instead of heavy includes
- ✅ No
using namespacein header scope - ✅ Trivial getters inline, complex methods declared only
C++ Source Prompts (.cpp) → cpp_coding_standards.instructions.md
| Prompt | Expected Patterns |
|---|---|
Create a C++ class to manage encoder readings | PascalCase class, camelCase methods |
Implement a velocity controller in C++ | is/has prefixes, kConstants |
Create a .cpp file with a function to calculate motor torque | Trailing _ for private members |
What to look for:
- ✅
PascalCasefor class names (EncoderManager,VelocityController) - ✅
camelCasefor methods (getPosition(),calculateTorque()) - ✅
is/hasprefixes for booleans (isCalibrated(),hasError()) - ✅ Trailing underscore for private members (
position_,velocity_) - ✅
kPascalCasefor constants (kMaxSpeed,kDefaultTimeout) - ✅
enum classwith PascalCase values
Python Prompts (.py) → python_coding_standards.instructions.md
| Prompt | Expected Patterns |
|---|---|
Create a Python script to log motor temperature | snake_case, type hints, docstrings |
Write a Python class to configure ODrive parameters | UPPER_CASE constants, _private |
Create a Python function to validate motor configuration | Google-style docstrings |
What to look for:
- ✅
snake_casefor functions (read_temperature(),configure_axis()) - ✅
PascalCasefor classes (TemperatureLogger,MotorConfig) - ✅
UPPER_CASEfor constants (MAX_TEMPERATURE,DEFAULT_INTERVAL) - ✅ Type hints on all parameters and returns (
def read_temp() -> float:) - ✅ Google-style docstrings with
Args:,Returns:,Raises: - ✅
_leading_underscorefor private members
How It Works: The applyTo Pattern
Each instruction file contains a glob pattern that controls when it’s loaded:
# Header rules - loaded for .h and .hpp files
applyTo: '**/*.{h,hpp}'

# C++ rules - loaded for .cpp, .c, .cc files
applyTo: '**/*.{cpp,c,cc}'

# Python rules - loaded for .py files
applyTo: '**/*.py'
This is automatic! You don’t need to specify which rules to use - Copilot detects the file type and loads the appropriate instructions.
3. Prompt Files (.prompt.md)
Prompt files are Markdown files that define reusable prompts for common development tasks. They are standalone prompts that you can run directly in chat.
Prompt File Structure
---
name: prompt-name
description: Brief description of what this prompt does
argument-hint: Optional hint text for users
agent: ask|edit|agent|custom-agent-name
model: Claude Sonnet 4
tools: ['search', 'fetch', 'githubRepo']
---

# Prompt Instructions

Your detailed instructions go here...

Use variables:
- ${workspaceFolder}
- ${file}
- ${selection}
- ${input:variableName}
- ${input:variableName:placeholder text}
Example: Build Firmware Prompt
This prompt builds ODrive firmware for specific board variants using the toolchain skill.
File: .github/prompts/build-firmware.prompt.md
# Build Firmware

Build ODrive firmware for specific board variants and configurations.

## Instructions

Use the **odrive-toolchain** skill to build firmware with proper board configuration.

### Workflow Hierarchy
copilot-instructions.md (Constitution) ↓ ODrive-Toolchain.agent (Orchestrator) ↓ odrive-toolchain skill ↓ build_firmware.py + setup-env.ps1
### Commands

```powershell
# Step 1: Source environment (Windows PowerShell)
. .github\skills\odrive-toolchain\setup-env.ps1

# Step 2: Build using the skill script
python .github\skills\odrive-toolchain\build_firmware.py board-v3.6-56V

# List available configurations
python .github\skills\odrive-toolchain\build_firmware.py --list-configs
Available Board Variants
| Board | Config String | Voltage | Notes |
|---|---|---|---|
| v3.6 | board-v3.6-56V | 56V | Current production |
| v3.5 | board-v3.5-24V | 24V | Legacy |
Output
On Success:
- ✅ Build completed successfully
- 📦 Binary location:
Firmware/build/ODriveFirmware.elf - 📊 Build statistics (size, warnings)
Example: Optimize Critical Path Prompt
This prompt optimizes performance-critical code in real-time execution paths.
File: .github/prompts/optimize-critical.prompt.md
---
name: optimize-critical
description: 'Optimize critical path code for performance'
agent: edit
---

Analyze the selected code block, which is part of a critical real-time execution path.

1. Identify any potential performance bottlenecks:
   - Division operations
   - Heavy trig functions
   - Memory allocation

2. Suggest 2-3 specific optimizations to reduce cycle count or memory usage.

3. Apply the changes if they are safe and don't reduce readability significantly.

4. **Strict rule**: No dynamic memory allocation (`new`, `malloc`, `std::vector` resizing) allowed.

5. Avoid unnecessary object copies; pass heavy objects by `const` reference where possible.
Usage:
- Select a code block in the editor
- Type
/optimize-criticalin Chat view - Copilot analyzes and suggests optimizations
Example: Embedded Safety Check Prompt
This prompt performs safety analysis on embedded firmware modules.
File: .github/prompts/check-safety.prompt.md
---
name: check-safety
description: 'Perform a safety check on a specific module'
agent: agent
---

Perform a safety analysis on the specified module file.

Check for:
1. **Race Conditions**: Shared variables accessed without locks/interrupt protection.
2. **Null Dereferences**: Pointers used without checking.
3. **Floating Point Safety**: Division by zero or likely NaN propagation.
4. **Deadlocks**: Potential lock ordering issues.

Output a Markdown report with a "Risk Level" (Low/Medium/High) for each finding.
Usage:
- Open a firmware source file (e.g.,
motor.cpp) - Type
/check-safetyin Chat view - Copilot analyzes the code and produces a safety report
Using Prompt Files
Example with Build Firmware:
- Type
/build-firmwarein Chat view - Copilot sources environment and builds for specified board
- Reports build status and output files
Example with Optimize Critical:
- Select performance-critical code in the editor
- Type
/optimize-criticalin Chat view - Copilot analyzes and applies safe optimizations
Create a Prompt File
-
In Chat view:
- Click Configure Chat (⚙️) > Prompt Files > New prompt file
- Or use Command Palette:
Chat: New Prompt File
-
Choose location:
- Workspace:
.github/prompts/(team sharing) - User profile: Available across all workspaces
- Workspace:
-
Author the prompt:
- Fill in YAML frontmatter
- Write clear instructions
- Use variables for flexibility
-
Use the prompt:
- Type
/prompt-namein Chat view - Provide any required arguments
- Type
4. Custom Agents (.agent.md)
Custom agents enable you to configure the AI to adopt different personas tailored to specific development roles and tasks.
Custom Agent Structure
---
name: agent-name
description: Brief description shown in chat input
argument-hint: Optional hint text
tools: ['search', 'fetch', 'usages', 'terminal']
model: Claude Sonnet 4
infer: true
handoffs:
  - label: Next Step Button Text
    agent: target-agent-name
    prompt: Prompt to send to next agent
    send: false
---

# Agent Instructions

Your specialized instructions go here...
Example: ODrive Engineer Agent
The primary development orchestrator for ODrive firmware.
File: .github/agents/ODrive-Engineer.agent.md
---
name: ODrive Engineer
description: Primary orchestrator agent for ODrive development. Invokes specialized skills for firmware, motor control, and hardware tasks.
tools: ['search', 'fetch', 'usages', 'githubRepo', 'terminal']
---

# ODrive Engineer (Primary Development Orchestrator)

You are the **primary development orchestrator** for the ODrive Development System.

## Quick Reference

| Attribute | Value |
|-----------|-------|
| **Role** | Primary Development Orchestrator |
| **Domains** | Firmware, Motor Control, Hardware |
| **Skills** | odrive-toolchain, control-algorithms, foc-tuning |
| **Invocation** | `@odrive-engineer [request]` |

## Skills Hierarchy
copilot-instructions.md (Constitution) ↓ ODrive-Engineer.agent (You - Primary Orchestrator) ↓ ┌───────┴────────┬──────────┬───────────┐ ↓ ↓ ↓ ↓ odrive- odrive- control- foc-tuning toolchain ops algorithms (🚧) (✅) (✅) (🚧)
## Safety

**CRITICAL:** Before ANY hardware operation (flashing, calibration, motor operation),
provide clear warnings and wait for explicit user confirmation.
Usage:
- Invoke with
@odrive-engineerin Chat view - Automatically routes requests to appropriate skills
Example: ODrive Toolchain Agent
Handles build, test, and code navigation operations.
File: .github/agents/ODrive-Toolchain.agent.md
---
name: ODrive Toolchain
description: Build, compile, test, and code navigation for ODrive firmware development
tools: ['search', 'fetch', 'terminal']
---

# ODrive Toolchain Agent

You handle **build, test, and code navigation** for ODrive firmware.

## Quick Reference

| Attribute | Value |
|-----------|-------|
| **Role** | Build & Test Operations |
| **Invocation** | `@odrive-toolchain [request]` |
| **Skill** | `odrive-toolchain` |

## What You Do

| Operation | Command |
|-----------|--------|
| **Build firmware** | `python .github/skills/odrive-toolchain/build_firmware.py board-v3.6-56V` |
| **Find symbols** | `python .github/skills/odrive-toolchain/search_symbol.py Controller` |
| **List errors** | `python .github/skills/odrive-toolchain/list_errors.py --filter encoder` |

## Safety

✅ **Safe**: Build, search, list errors, run software tests
⚠️ **Confirmation Required**: Flash firmware, HIL tests
Usage:
- Invoke with
@odrive-toolchain build firmware for v3.6 - Automatically sources environment and executes build scripts
Create a Custom Agent
-
In Chat view:
- In agents dropdown, select Configure Custom Agents > Create new custom agent
- Or use Command Palette:
Chat: New Custom Agent
-
Choose location:
- Workspace:
.github/agents/(team sharing) - User profile: Available across all workspaces
- Workspace:
-
Author the agent:
- Fill in YAML frontmatter
- Define tools and model
- Write specialized instructions
- Add handoffs if needed
-
Use the agent:
- Select from agents dropdown in Chat view
- All prompts use this agent’s configuration
5. Agent Skills (SKILL.md folders)
Agent Skills are folders of instructions, scripts, and resources that Copilot can load when relevant to perform specialized tasks.
Skill vs Instructions Comparison
| Feature | Agent Skills | Custom Instructions |
|---|---|---|
| Purpose | Specialized capabilities & workflows | Coding standards & guidelines |
| Portability | Works across VS Code, CLI, GitHub.com | VS Code and GitHub.com only |
| Content | Instructions + scripts + examples + resources | Instructions only |
| Loading | On-demand when relevant | Always applied or via glob patterns |
| Standard | Open standard (agentskills.io) | VS Code-specific |
Skill Structure
Example from the ODrive toolchain skill:
.github/skills/odrive-toolchain/
├── SKILL.md                 # Skill definition
├── setup-env.ps1            # Environment setup script
├── build_firmware.py        # Build automation
├── search_symbol.py         # Symbol search tool
├── list_errors.py           # Error code listing
└── find_symbol.ps1          # Quick symbol search
Example: ODrive Toolchain Skill
File: .github/skills/odrive-toolchain/SKILL.md
---
name: odrive-toolchain
description: Build, test, search, and error inspection for ODrive firmware
status: production
version: 1.0.0
---

# ODrive Toolchain Skill

All build, test, search, and error inspection scripts in one place.

## Scripts

| Script | Purpose | Usage |
|--------|---------|-------|
| `setup-env.ps1` | Add tup + ARM GCC to PATH | `. .\setup-env.ps1` |
| `build_firmware.py` | Build firmware for board | `python build_firmware.py board-v3.6-56V` |
| `search_symbol.py` | Search for symbols | `python search_symbol.py Encoder --type class` |
| `list_errors.py` | List error codes | `python list_errors.py --filter encoder` |

## Quick Usage

### Build Firmware
```powershell
. .github\skills\odrive-toolchain\setup-env.ps1
python .github\skills\odrive-toolchain\build_firmware.py board-v3.6-56V
Safety
✅ Safe: All operations are read-only or local builds
⚠️ Never auto-execute: Flash firmware, HIL tests
### Example: FOC Tuning Skill (Stub)

This shows how to create a skill that's in development.

**File:** `.github/skills/foc-tuning/SKILL.md`

```markdown
---
name: foc-tuning
description: 🚧 STUB - Automated FOC parameter tuning procedures and optimization
status: in-development
---

# FOC Tuning Skill (🚧 In Development)

**Status:** Stub - Planned for future implementation
**Owner:** motor-control-engineer.agent

## Purpose

This skill will provide automated tuning procedures for Field-Oriented Control (FOC) motor controllers.

## Planned Capabilities

- Automated current loop bandwidth measurement
- Velocity loop step response tuning
- Position loop gain optimization
- Anti-cogging calibration procedures
- Stability margin analysis

## Dependencies

- Motor parameter identification
- Hardware-in-the-loop testing infrastructure

## Implementation Status

- [ ] Current loop auto-tuning
- [ ] Velocity loop auto-tuning
- [ ] Position loop auto-tuning
- [ ] Anti-cogging calibration

## Related Skills

- `control-algorithms` - Controller implementations
- `sensorless-control` - Observer tuning
Note: Stub skills document planned functionality before implementation.
Create an Agent Skill
-
Enable skills:
- Open Settings (Ctrl+,)
- Search for
chat.useAgentSkills - Enable the setting
-
Create skill directory:
.github/skills/my-skill/ └── SKILL.md -
Author SKILL.md:
- Fill in YAML frontmatter:
name: lowercase with hyphens (e.g.,my-skill)description: Clear description of what the skill does and when to use it
- Write detailed instructions
- Reference any bundled resources
- Fill in YAML frontmatter:
-
Add resources (optional):
- Scripts in
scripts/ - Examples in
examples/ - Documentation in
references/
- Scripts in
-
Test the skill:
- Create a prompt that matches skill description
- Copilot auto-loads skill when relevant
6. Plan Mode (Preview) 🆕
Note: This feature is in public preview and subject to change.
Plan Mode is GitHub Copilot’s agentic issue creation feature that transforms your project ideas into structured epics, features, and tasks. It’s the bridge between vision and execution.
What is Plan Mode?
Plan Mode helps you manage project planning using GitHub Issues with Copilot. You can turn product ideas into structured backlogs with epics, features, and tasks - all through natural language conversation.
Plan Mode Workflow
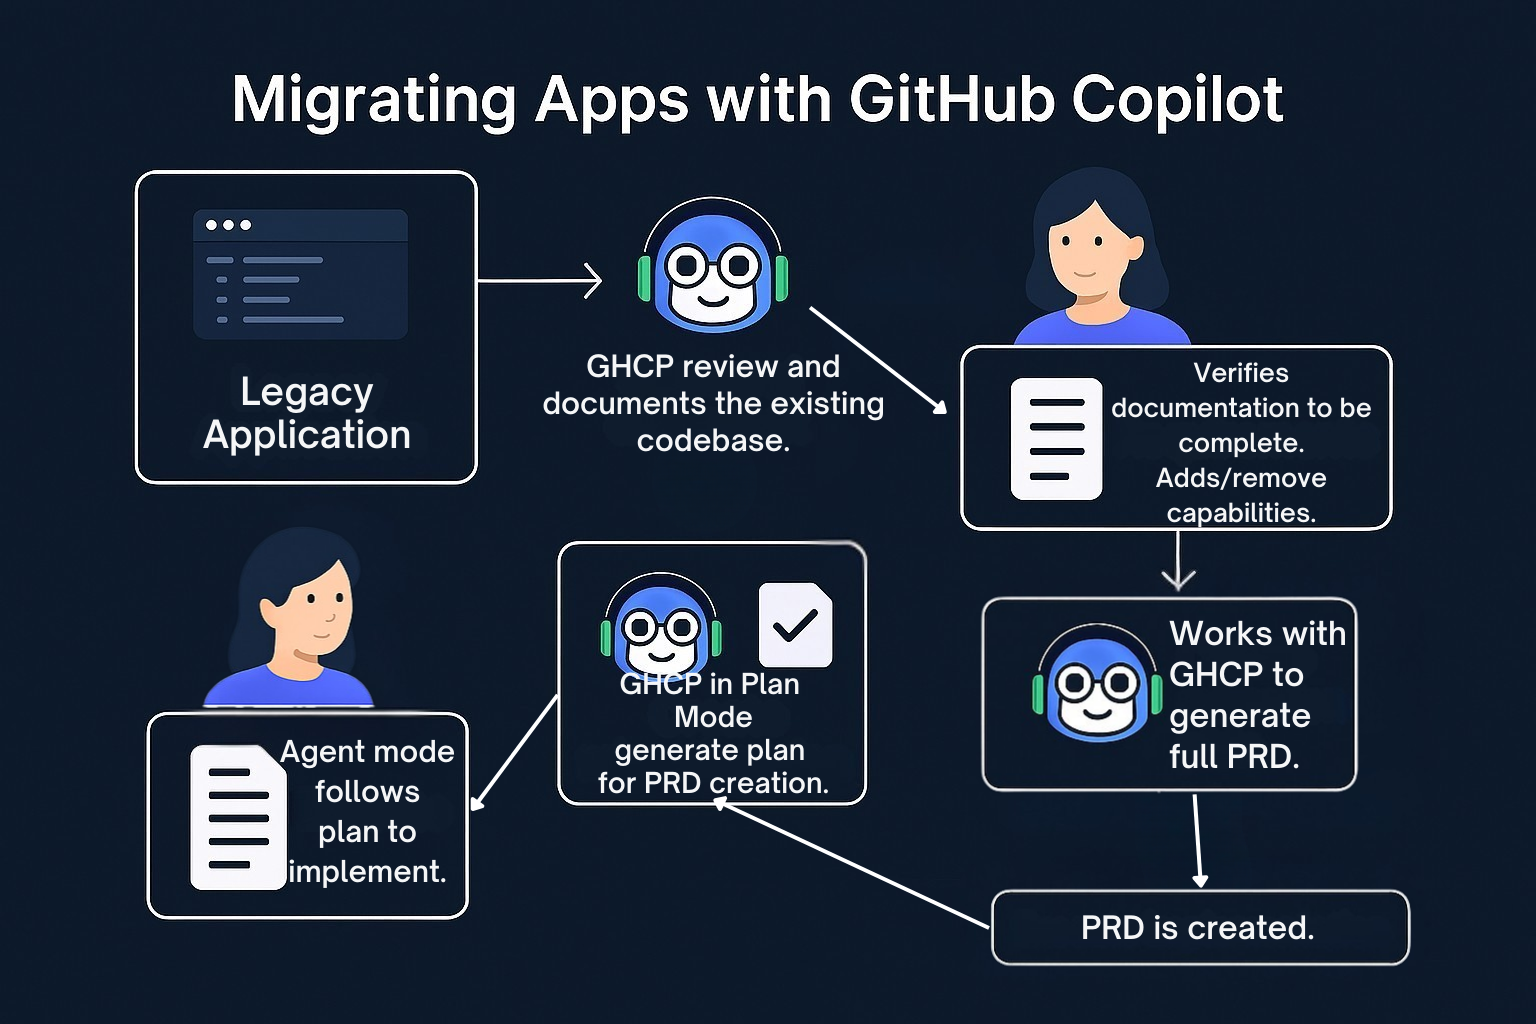
Plan Mode workflow: Legacy application → GHCP documents codebase → Verify & refine → Generate PRD → Plan Mode creates structured plan → Agent mode implements.
When to Use Plan Mode
| Scenario | Plan Mode Benefit |
|---|---|
| New project kickoff | Turn ideas into structured issues |
| Legacy migration | Break down complex migrations into phases |
| Feature planning | Decompose features into actionable tasks |
| Sprint planning | Generate detailed task breakdowns |
| Technical debt | Organize refactoring into manageable chunks |
Plan Mode Best Practices
-
Be Specific in Your Prompt
- Include technology stack
- Specify requirements and constraints
- Mention team structure if relevant
-
Iterate on Generated Issues
- Ask Copilot to break down high-level issues
- Request improved descriptions with code snippets
- Add acceptance criteria and technical details
-
Use Versioning
- Compare different versions of generated issues
- Keep the best aspects from each version
-
Organize Hierarchically
- Epic → Features → Tasks
- Use clear naming conventions
- Link related issues appropriately
Example: Ada to C++ Migration Plan
We’ve created a complete migration plan using Plan Mode. See the example:
This plan demonstrates:
- Epic structure for the overall migration project
- Feature breakdown for each migration phase
- Task decomposition with specific prompts
- Pattern mappings between Ada and C++ constructs
- Risk assessment and timeline estimation
How to Use Plan Mode
Step 1: Start the Conversation
I'm planning to migrate an Ada embedded system to Modern C++.
The system has cyclic tasks, protected objects, and strong types.
Please help me create a structured project plan with epics, features, and tasks.
Step 2: Review and Refine
After Copilot generates the initial plan:
- Click on epics to view details
- Navigate the issue tree
- Request breakdowns of high-level items
Can you break down the "Feature: Concurrency Migration" into smaller tasks?Step 3: Improve Descriptions
Can you improve the description for "Task: Migrate Storage protected object"?
Please include:
- Technical summary
- Ada to C++ pattern mapping
- Implementation steps
- Code snippets
- Acceptance criteria
Step 4: Create Issues
Once satisfied with the plan:
- Review all generated issues
- Click “Create all” to create issues in your repository
- Assign to team members or Copilot
Plan Mode + Agents + Skills
Plan Mode works seamlessly with custom agents and skills:
┌───────────────────────────────────────────────────────────────┐
│                         Plan Mode                              │
│  Creates structured epics, features, and tasks                 │
└───────────────────────────────────────────────────────────────┘
                              │
                              ▼
┌───────────────────────────────────────────────────────────────┐
│                      Custom Agents                             │
│  @ada-to-cpp-migrator executes specific migration tasks        │
└───────────────────────────────────────────────────────────────┘
                              │
                              ▼
┌───────────────────────────────────────────────────────────────┐
│                         Skills                                 │
│  ada-cpp-migration provides patterns, templates, references    │
└───────────────────────────────────────────────────────────────┘
Plan Mode Output Example
## 📋 Epic: Migrate Ada System to C++

### 🎯 Feature 1: Project Analysis
- Task 1.1: Scan Ada source files
- Task 1.2: Build dependency graph
- Task 1.3: Inventory concurrency patterns

### 🎯 Feature 2: Foundation Setup
- Task 2.1: Create C++ project structure
- Task 2.2: Implement strong type library
- Task 2.3: Create task wrapper framework

### 🎯 Feature 3: Type Migration
- Task 3.1: Migrate HK_Data package
- Task 3.2: Migrate TTC_Data package
...
Further Reading
- Using GitHub Copilot to create or update issues
- Best practices for using GitHub Copilot to work on tasks
- Asking GitHub Copilot to create a pull request
7. Spec-Driven Development 🆕
What it is: A formalized process for providing AI models with guardrails through specifications, plans, and tasks - enabling production-quality, maintainable software.
Why Spec-Driven Development?
When developers first adopt AI coding assistants, many start with “vibe coding” - having an idea, typing a few sentences, and letting the AI figure it out. This approach has benefits (fast prototyping) but significant downsides for production software:
| Vibe Coding Approach | Spec-Driven Approach |
|---|---|
| AI makes architectural decisions for you | You define architectural constraints upfront |
| Framework/library choices are arbitrary | Stack choices are explicit and intentional |
| Inconsistent patterns across the codebase | Consistent conventions enforced by specs |
| Harder to maintain long-term | Documentation and context preserved |
| Difficult to onboard new team members | Clear specifications for everyone |
Key Insight: “If you start building production software, software that needs to be maintained by somebody, software that needs to evolve down the line beyond your initial prototype, that vibe coding approach doesn’t really scale because the AI doesn’t have the sense of taste or conventions that you need to be applying.”
Plan Mode vs. Spec-Driven Development
Both approaches help you plan before coding, but they serve different purposes:
| Aspect | Plan Mode | Spec-Driven Development |
|---|---|---|
| Scope | Single feature or idea → issues | Entire project or major feature → full implementation |
| Output | GitHub Issues (epics, features, tasks) | Markdown specs, plans, tasks + code |
| Primary Use | Project management, sprint planning | Production codebases, team collaboration |
| Integration | GitHub Issues | Works with any agent (Copilot, Claude, Gemini) |
| Artifacts | Issues in your repository | spec.md, plan.md, tasks.md files |
| Best For | Breaking down work for a team | Ensuring consistent, high-quality AI output |
When to use Plan Mode:
- You want to create GitHub Issues for tracking
- You’re planning sprints or breaking down features
- You need to assign tasks to team members
- You want Copilot to create PRs from issues
When to use Spec-Driven Development:
- You’re building production software that needs to scale
- You want the AI to follow specific conventions consistently
- You’re working on a greenfield project with complex requirements
- You need to explore multiple implementation variations (e.g., Hugo vs Next.js)
- You want a documented decision trail for your project
The Spec-Driven Workflow
┌─────────────────────────────────────────────────────────────────┐
│                    1. CONSTITUTION                               │
│    Non-negotiable principles: stack, deployment, coding style   │
│    File: constitution.md or agents.md                           │
└─────────────────────────────────────────────────────────────────┘
                              │
                              ▼
┌─────────────────────────────────────────────────────────────────┐
│                    2. SPECIFICATION                              │
│    Functional requirements: user stories, scenarios, edge cases │
│    File: specs/001-feature-name/spec.md                         │
└─────────────────────────────────────────────────────────────────┘
                              │
                              ▼
┌─────────────────────────────────────────────────────────────────┐
│                    3. CLARIFICATION                              │
│    AI asks questions YOU didn't think to ask                    │
│    "How will episode data be managed?" "Expected catalog size?" │
└─────────────────────────────────────────────────────────────────┘
                              │
                              ▼
┌─────────────────────────────────────────────────────────────────┐
│                    4. TECHNICAL PLAN                             │
│    Architecture, dependencies, data models, contracts           │
│    File: specs/001-feature-name/plan.md                         │
└─────────────────────────────────────────────────────────────────┘
                              │
                              ▼
┌─────────────────────────────────────────────────────────────────┐
│                    5. TASKS                                      │
│    Broken-down implementation steps with MVP identification     │
│    File: specs/001-feature-name/tasks.md                        │
└─────────────────────────────────────────────────────────────────┘
                              │
                              ▼
┌─────────────────────────────────────────────────────────────────┐
│                    6. IMPLEMENTATION                             │
│    Agent executes tasks one by one, following the plan          │
│    Each task can be parallelized or done in background          │
└─────────────────────────────────────────────────────────────────┘
Key Artifacts
1. Constitution (constitution.md or agents.md)
Non-negotiable principles for your entire project:
# Project Constitution

## Non-Negotiable Principles

### Deployment
- Always deploy to Azure
- Use Azure-specific packages, not other cloud providers

### Technology Stack
- Always use the latest LTS version of Node.js
- Use TypeScript with strict mode enabled
- Use this specific logging package: [package-name]

### Performance
- Lighthouse score must be 90+ for all pages
- Static-first architecture

### Development Workflow
- Test against Chrome, Firefox (Safari optional)
- All code must have unit tests
2. Specification (spec.md)
Functional requirements with user stories and scenarios:
# Feature: Podcast Website

## User Stories

### Browse Featured Episodes
As a visitor, I want to see featured episodes on the landing page
so that I can quickly discover popular content.

**Scenarios:**
- Display 3-5 featured episodes with thumbnails
- Show episode title, duration, and publish date
- Link to episode detail page

### View Episode Details
As a visitor, I want to view episode details including:
- Full description
- Audio player
- Show notes
- Guest information

## Edge Cases
- Episode with no guest
- Episode longer than 2 hours
- Missing thumbnail image
3. Clarification Session
The AI asks questions you didn’t think to ask:
| Question | Options | Answer |
|---|---|---|
| How will episode data be managed? | A) Admin CMS B) Static JSON C) RSS import | B |
| Expected episode catalog size? | A) 10-50 B) 50-100 C) 100-200 D) 200+ | D |
| Audio hosting provider? | A) Self-hosted B) Libsyn C) Transistor | A |
4. Technical Plan (plan.md)
Architecture and implementation details:
# Technical Plan: Podcast Website

## Technical Context
- Framework: Hugo (static site generator)
- Templating: Go templates with HTML5
- Styling: Tailwind CSS
- Build: npm for asset pipeline

## Dependencies
- hugo-extended v0.120+
- tailwindcss v3.4+
- alpinejs v3.x (minimal interactivity)

## Content Structure
content/
├── episodes/
│   ├── ep001-introduction.md
│   └── ep002-guest-interview.md
├── guests/
│   └── john-doe.md
└── pages/
    ├── about.md
    └── contact.md

## Data Model
### Episode
| Field | Type | Required |
|-------|------|----------|
| title | string | ✓ |
| date | datetime | ✓ |
| duration | string | ✓ |
| audio_url | url | ✓ |
| description | markdown | ✓ |
| guest | reference | |
| featured | boolean | |
5. Tasks (tasks.md)
Broken-down implementation steps:
# Implementation Tasks

## MVP (Phase 1)
- [ ] Task 1.1: Initialize Hugo project structure
- [ ] Task 1.2: Create base layout with header/footer
- [ ] Task 1.3: Implement episode list template
- [ ] Task 1.4: Implement episode detail template
- [ ] Task 1.5: Add Tailwind CSS configuration

## Phase 2: Enhanced Features
- [ ] Task 2.1: Add audio player component
- [ ] Task 2.2: Create guest profile pages
- [ ] Task 2.3: Implement search functionality
Getting Started with SpecKit
GitHub SpecKit is a collection of prompts and scripts that implement spec-driven development. It works with any agent (Copilot, Claude, Gemini, etc.).
Installation
# Using UV (recommended for Python)
uv tool install spec-kit

# Initialize in a new project
specify init my-project

# Initialize in an existing project
cd my-existing-project
specify init .
Workflow Commands
| Command | Purpose |
|---|---|
specify init | Initialize SpecKit in a project |
| Constitution | Establish non-negotiable project principles |
| Build Specification | Create functional requirements |
| Clarify | AI asks questions to fill gaps |
| Build Technical Plan | Generate architecture and data models |
| Create Tasks | Break down into implementable steps |
| Implement | Execute tasks one by one |
Example Session
# Start with constitution
> Create a constitution for a static podcast website with minimal dependencies

# Build the specification
> Build a specification for a podcast website with featured episodes

# Clarify requirements (AI asks you questions)
> Clarify spec requirements
  - Q1: How will episode data be managed? → B (Static JSON)
  - Q2: Expected catalog size? → D (200+ episodes)
  - Q3: Audio hosting? → A (Self-hosted)

# Generate technical plan
> Build technical plan using Hugo and Tailwind CSS

# Create tasks
> Create implementation tasks

# Implement
> Implement tasks
Benefits for Existing Projects
Spec-driven development isn’t just for greenfield projects:
-
Retroactive Documentation
- Point SpecKit at your existing codebase
- Generate a constitution based on current patterns
- Document what’s already there
-
New Feature Development
- Create a new spec folder:
specs/002-new-feature/ - Go through the spec → plan → tasks workflow
- Maintain historical context for future changes
- Create a new spec folder:
-
Multiple Variations
- Create one spec, fork into multiple implementations
- Compare Hugo vs Next.js for the same requirements
- Use git worktrees for parallel exploration
Spec-Driven vs. Custom Instructions
| Custom Instructions | Spec-Driven Development |
|---|---|
copilot-instructions.md | constitution.md + spec.md + plan.md |
| Applied automatically to all requests | Invoked explicitly per feature |
| General coding standards | Detailed functional + technical specs |
| Good for coding style | Good for architectural decisions |
| Complements spec-driven | Uses custom instructions as foundation |
Best Practice: Use both! Custom instructions for always-on coding standards, spec-driven development for major features and architectural work.
Further Reading
- GitHub SpecKit Repository - 53K+ stars
- SpecKit Documentation
- Spec-Driven Development with Existing Projects (YouTube)
Speaker Instructions
1. Demo: Why Planning Matters (10 min)
Show the problem:
- Open Chat view and generate code without any instructions
- Show generic, non-project-specific output
- Highlight inconsistencies across multiple generations
Show the solution:
- Add a
.github/copilot-instructions.mdfile with project standards - Generate similar code again
- Highlight improved consistency and adherence to standards
Key points to emphasize:
- Context matters for quality
- Repetition wastes time
- Team collaboration benefits
- Version control for AI behavior
2. Demo: Custom Instructions (10 min)
Create copilot-instructions.md:
- Create
.github/copilot-instructions.md - Add C++ coding standards
- Add embedded constraints
- Add documentation requirements
Test the instructions:
- Ask Copilot to generate a motor control function
- Show it follows static allocation rules
- Show it includes Doxygen comments
- Show it avoids exceptions
Example for ODrive project:
# ODrive Firmware Coding Standards

## C++ Standards
- Use C++17
- No exceptions
- No RTTI
- Static allocation only

## Motor Control
- All control loops at 8kHz
- Use fixed-point math where possible
- Document timing constraints

## HAL Patterns
- Abstract hardware access
- Use volatile for registers
- Document interrupt context
3. Demo: Prompt Files (10 min)
Create reusable prompts:
-
Create state machine generator:
- File:
.github/prompts/generate-state-machine.prompt.md - Demonstrates code generation workflow
- Shows variable usage
- File:
-
Create code review prompt:
- File:
.github/prompts/embedded-review.prompt.md - Demonstrates analysis workflow
- Shows tool selection
- File:
Use the prompts:
- Type
/generate-state-machinein chat - Provide state machine name
- Show generated code follows standards
4. Demo: Custom Agents (12 min)
Create specialized agents:
-
Planning Agent:
- Read-only tools
- Generates implementation plans
- Handoff to implementation agent
-
Embedded Expert Agent:
- Editing tools enabled
- Specialized embedded knowledge
- MISRA compliance focus
-
Code Reviewer Agent:
- Analysis tools only
- Security focus
- Handoff to fix issues
Demo workflow:
- Switch to Planning agent
- Generate plan for new feature
- Use handoff to Implementation agent
- Make code changes
- Use handoff to Code Reviewer agent
- Review and suggest improvements
5. Demo: Agent Skills (10 min)
Create example skill:
- Create
.github/skills/misra-compliance/ - Add SKILL.md with MISRA rules
- Include example scripts for checking
- Add reference documentation
Show progressive loading:
- Skill discovered by name/description
- Instructions loaded when relevant
- Resources accessed as needed
Test the skill:
- Ask: “Check this code for MISRA compliance”
- Copilot auto-loads the skill
- Uses bundled resources for checks
- Provides detailed compliance report
6. Demo: Hands-On Exercise (8 min)
Walk through creating a complete customization setup:
- Create copilot-instructions.md for project
- Create one prompt file
- Create one custom agent
- Create one skill folder
Hands-On Exercises
Duration: 20 minutes
For the hands-on portion of this lesson, participants should follow the dedicated exercises file:
Exercise Overview
| Exercise | Focus | Time |
|---|---|---|
| 1. Custom Instructions | Create coding standards + test with #file: references | 5 min |
| 2. Prompt Files | Create reusable prompts + test with /command | 5 min |
| 3. Custom Agents | Create specialized persona + test with real code | 5 min |
| 4. Agent Skills | Create skill folder + test auto-discovery | 5 min |
Key Learning Outcomes
After completing the exercises, participants will be able to:
- ✅ Create custom instructions that auto-apply based on file type
- ✅ Build reusable prompt files invoked with
/name - ✅ Design specialized agents with checklists and output formats
- ✅ Package skills with bundled resources
- ✅ Use
#file:references to verify instructions are applied - ✅ Check the References panel to debug customization issues
Quick Start
- Open the hands-on-exercises.md file
- Start with Exercise 1 (Custom Instructions)
- Complete as many exercises as time allows
- Focus on Exercises 1-2 if short on time
Quick Reference: Customization Options
File Locations
| Type | Workspace Location | User Profile |
|---|---|---|
| Global Instructions | .github/copilot-instructions.md | N/A |
| Conditional Instructions | .github/instructions/*.instructions.md | Profile folder |
| Prompt Files | .github/prompts/*.prompt.md | Profile folder |
| Custom Agents | .github/agents/*.agent.md | Profile folder |
| Agent Skills | .github/skills/*/SKILL.md | ~/.copilot/skills/ |
When to Use Each
| Use Case | Solution |
|---|---|
| Project coding standards | .github/copilot-instructions.md |
| Language-specific rules | *.instructions.md with applyTo glob |
| Common development tasks | .prompt.md files |
| Specialized personas | .agent.md files |
| Complex workflows with resources | Skills with SKILL.md |
| Planning workflows | Agent with read-only tools + handoffs |
Variables in Prompt Files
| Variable | Description |
|---|---|
${workspaceFolder} | Workspace root path |
${file} | Current file path |
${fileBasename} | Current file name |
${fileDirname} | Current file directory |
${selection} | Selected text |
${selectedText} | Selected text (alias) |
${input:name} | User input variable |
${input:name:placeholder} | User input with placeholder |
Tool Selection
| Tool Category | Tools | Use Case |
|---|---|---|
| Read-only | search, fetch, githubRepo, codebase | Planning, research, analysis |
| File operations | create_file, edit_files, read_file | Implementation, refactoring |
| Terminal | run_in_terminal, get_terminal_output | Build, test, deployment |
| Testing | runTests, test_failure | Test generation, debugging |
| Source control | changes, get_changed_files | Code review, commit messages |
Troubleshooting
| Issue | Solution |
|---|---|
| Instructions not applying | Verify github.copilot.chat.codeGeneration.useInstructionFiles is enabled |
| Prompt file not found | Check file is in .github/prompts/ with .prompt.md extension |
| Custom agent not showing | Verify file is in .github/agents/ with .agent.md extension |
| Skill not loading | Enable chat.useAgentSkills setting and verify SKILL.md format |
| Glob pattern not matching | Test pattern syntax, ensure paths are relative to workspace root |
| Tool not available | Check tool name spelling, verify MCP server is running |
| Variables not resolving | Use correct syntax ${variableName}, check variable is supported |
| Handoff button not appearing | Verify handoffs array in agent frontmatter, check target agent exists |
| Workspace customization not shared | Ensure files are committed to source control in .github/ folder |
| User profile customization not syncing | Enable Settings Sync and include “Prompts and Instructions” |
Debug Tips
-
Check which instructions are loaded:
- Look at References section in chat response
- Use Chat Debug view to see language model requests
-
Verify tool availability:
- Use Tools picker in Chat view
- Check MCP server status
-
Test glob patterns:
- Use VS Code’s file search with glob pattern
- Verify pattern matches intended files
-
Review agent configuration:
- Configure Custom Agents > hover over agent name
- Tooltip shows source location
Additional Resources
Official Documentation
- Custom Instructions Guide
- Prompt Files Documentation
- Custom Agents Documentation
- Agent Skills Standard
Community Resources
- Awesome Copilot Repository - Community examples
- VS Code Copilot Settings
- GitHub Copilot Documentation
Example Repositories
Your workspace already has examples in:
.github/agents/- Custom agent examples.github/instructions/- Instructions file examples.github/prompts/- Prompt file examples.github/skills/- Agent skill examples
Best Practices
Custom Instructions
-
Be specific and concise
- Clear, actionable guidelines
- Avoid ambiguity
- Use examples
-
Organize by topic
- Language standards
- Project constraints
- Documentation
- Testing
-
Use multiple files for complex projects
- Language-specific instructions
- Domain-specific instructions
- Role-specific instructions
-
Reference, don’t duplicate
- Link to external style guides
- Reference existing documentation
- Avoid repeating project docs
-
Version control
- Commit to source control
- Review changes as code
- Document updates
Prompt Files
-
Make prompts reusable
- Use variables for flexibility
- Avoid hardcoded values
- Support arguments
-
Provide clear examples
- Show expected input
- Show expected output
- Include edge cases
-
Select appropriate tools
- Match tools to task
- Don’t over-specify
- Use tool sets when appropriate
-
Test thoroughly
- Use editor play button
- Test with different inputs
- Refine based on results
Custom Agents
-
Single responsibility
- One clear purpose per agent
- Focused tool set
- Specialized instructions
-
Use handoffs for workflows
- Plan → Implement → Review
- Clear transition points
- Context preservation
-
Tool selection matters
- Planning: read-only tools
- Implementation: editing tools
- Review: analysis tools
-
Reference existing instructions
- Link to instructions files
- Don’t duplicate guidelines
- Keep agents focused
Agent Skills
-
Clear, specific descriptions
- What the skill does
- When to use it
- Key capabilities
-
Bundle related resources
- Templates
- Scripts
- Examples
- Documentation
-
Progressive disclosure
- Keep SKILL.md focused
- Reference resources as needed
- Don’t overload context
-
Follow open standard
- Use standard structure
- Compatible across tools
- Community shareable
Frequently Asked Questions
Q: How do I share customizations with my team?
Short Answer: Commit .github/ folder files to your repository.
Detailed Explanation:
- All files in
.github/(instructions, prompts, agents, skills) can be version controlled - Team members get the same AI behavior when they clone the repo
- Changes can be reviewed via pull requests
- Use
~/.copilot/skills/for personal customizations that shouldn’t be shared
Q: What’s the difference between agents and skills?
Short Answer: Agents are personas you select; skills are auto-loaded capabilities.
Detailed Explanation:
- Agents: You explicitly select from dropdown. Define specialized behavior and tools.
- Skills: Automatically discovered based on prompt content. Bundled with resources.
Example:
- Agent: “Embedded Expert” - always responds with embedded constraints in mind
- Skill: “MISRA Compliance” - auto-loads when you mention MISRA or code review
Q: Can I use conditional instructions for different parts of my project?
Short Answer: Yes, use glob patterns in applyTo frontmatter.
Detailed Explanation:
Create multiple .instructions.md files with different patterns:
---
name: Firmware C++ Rules
description: C++ rules specific to firmware code
applyTo: 'Firmware/**/*.cpp'
---
# Firmware C++ Rules
---
name: Python Tool Rules
description: Python rules for tooling scripts
applyTo: 'Tools/**/*.py'
---
# Python Tool RulesThe appropriate instructions load based on which file you’re working with.
Q: How do I debug why my custom agent isn’t working?
Short Answer: Check file location, extension, and frontmatter format.
Detailed Explanation:
- Location: Must be in
.github/agents/or user profile - Extension: Must be
.agent.md - Frontmatter: Must have valid YAML with
nameanddescription - Tools: Tool names must match exactly (
edit_filesnoteditFiles) - Reload: Sometimes VS Code needs restart to pick up new agents
Q: Can skills reference external URLs or APIs?
Short Answer: Skills can include instructions for using #fetch tool.
Detailed Explanation: Skills themselves don’t make API calls, but they can:
- Include
fetchin their tool list - Provide instructions for fetching specific URLs
- Document API endpoints and expected responses
- The agent then uses the fetch tool during execution
Q: How do handoffs work between agents?
Short Answer: Handoffs create buttons that switch to another agent with context.
Detailed Explanation:
handoffs:
  - label: "Start Implementation"    # Button text
    agent: agent                     # Target agent
    prompt: "Implement the plan..."  # Prompt sent to target
    send: false                      # true = auto-send, false = user reviews
When clicked:
- Conversation context transfers to the target agent
- The specified prompt is queued (or sent automatically)
- User can review and modify before sending
Summary: Key Takeaways
1. Customization Hierarchy
- Instructions: Always-on coding standards
- Prompts: Reusable task templates (
/name) - Agents: Specialized personas (dropdown selection)
- Skills: Auto-loaded capabilities with resources
2. File Locations Matter
.github/copilot-instructions.md- Global, always applied.github/instructions/*.instructions.md- Conditional via glob.github/prompts/*.prompt.md- Invoked with/name.github/agents/*.agent.md- Selected from dropdown.github/skills/*/SKILL.md- Auto-discovered
3. Front-Loading Context Wins
- Define standards once, apply everywhere
- Reduce repetition in prompts
- Ensure consistent team behavior
- Version control your AI configuration
4. Layer Your Customizations
- Base: Global instructions (coding standards)
- Task: Prompt files (specific workflows)
- Role: Custom agents (specialized personas)
- Capability: Skills (complex tasks with resources)
5. Test and Iterate
- Verify instructions are being applied
- Test prompts produce expected output
- Refine agents based on actual usage
- Share successful patterns with team
Next Steps
After completing this session:
-
Create your base customization:
- Start with
.github/copilot-instructions.md - Add language-specific instructions as needed
- Test and refine based on results
- Start with
-
Build prompt library:
- Identify common tasks in your workflow
- Create 3-5 prompt files for most frequent tasks
- Share with team and iterate
-
Develop specialized agents:
- Create agents for different development roles
- Add handoffs for common workflows
- Experiment with tool combinations
-
Create domain skills:
- Identify specialized knowledge areas
- Package instructions with resources
- Share across tools (VS Code, CLI, GitHub.com)
-
Team adoption:
- Commit customizations to source control
- Document team workflows
- Gather feedback and improve
Lesson 3: Planning & Steering Documents - GitHub Copilot Customization
Last Updated: January 2026